Endgames are often overlooked, yet they hold a profound significance in the game of chess. While there is a vast array of endgame concepts to study, grasping the fundamentals is essential. This blog serves as a valuable resource to assess your endgame prowess and broaden your understanding.
Contained within are 10 engaging endgame puzzles, designed to challenge and sharpen your strategic thinking. With each correct answer, you earn a commendable 10 points, reflecting your proficiency in navigating these crucial stages of the game.
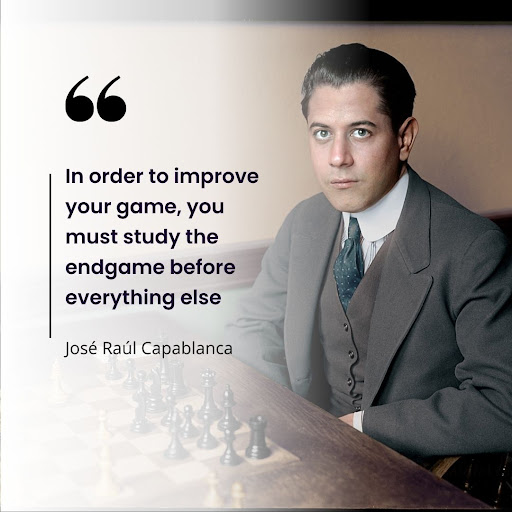
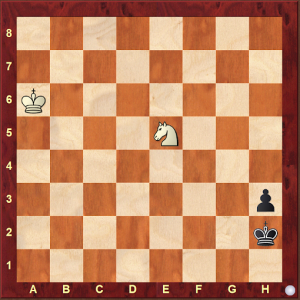
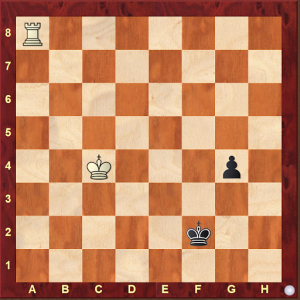
1. Mined Squares
White to play and win
Like landmines that explode upon stepping on them, mined squares on chess causes you to lose the game if your king gets there.
In the above diagram both the pawns are fixed and kings are trying to attack the enemy pawns and promote their own pawn.
White has an opportunity to avoid the mined square and put black in a zugzwang. Can you solve it?
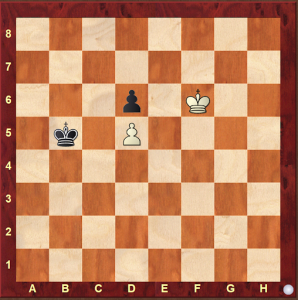
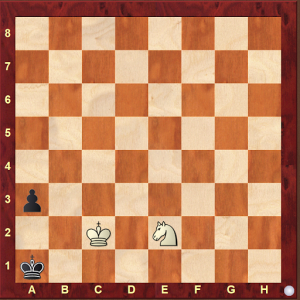
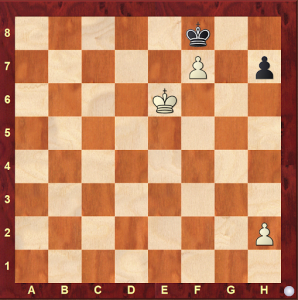
2. Corresponding Squares
White to play and win
Corresponding squares in chess endgames means a square which the defending king must move to in order to keep the opposing king away.
In the above position, White pawns are doubled and can win if gets his King on c4 but to do that he has to be cautious as one wrong move can lead to a draw. Put your corresponding squares knowledge to test and win the game!
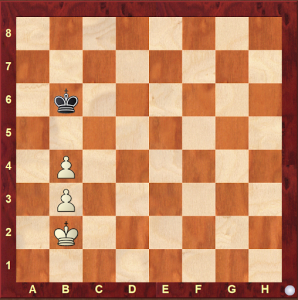
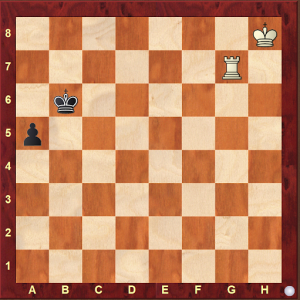
3. The Philidor Position
White to Play and Draw
Most rook and king end games are a draw, but if one player is up a pawn that can be game changing. However, the defending player can draw the game with a technique called the Philidor position, also called 3rd rank defense. Do remember, your player with the pawn down must move his king to the square of the pawn promotion.
Every chess player must know the above position and the answer to it. In my entire chess career I have been in this position four times and it has helped me to get half a point against strong players as opposed to zero!
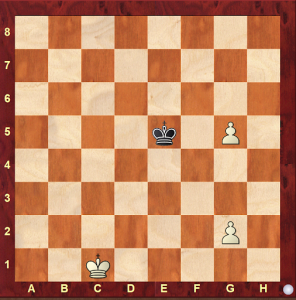
4. Knight Saves the Game!
White to play and draw
The position in the above diagram is a perfect demonstration of how tricky and mischievous a Knight can be. Here white Knight keeps hopping on four squares around the pawn and stops black from winning.
5. Knightmare!
White to play and win
This position is a good example between the thin line between draw and a checkmate! Can you spot the mate in 2?
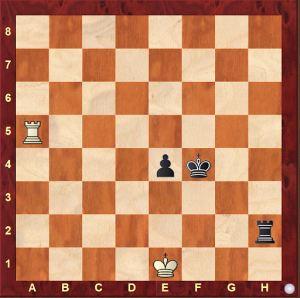
6. Cutting-off the King
White to play and win
In the above position White’s King is too far away in a corner and black is threatening to promote the pawn. Can white stop the pawn without giving up the rook, and win?
7. Doubled Pawns. Boon or Bane?
White to play and win
Normally having doubled pawns is considered to be a curse but here it turns out to be a blessing for white. A good example demonstrating exceptions to principles in Chess. Can you find the winning moves?
8. Time-Gaining Check
White to play and win
White king is far away and the rook is not attacking the pawn. How should white rook check the black king to gain time?
9. Win or stalemate?
White to play and win
In the above diagram black king is in front of the pawn and hoping to be stalemated but white takes advantage of black’s pawn (which can be moved to avoid stalemate) and wins the game. Can you spot it?
10. Rook in front of the Pawn
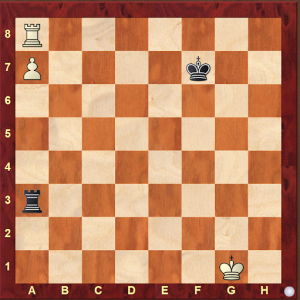
White to play and win
In the above position White has a pawn on 7th rank and the white rook is in front of the pawn. The pawn cant be promoted until the rook moves, but moving the rook removes the defense of the pawn, and black rook can capture it.
Can you spot the winning tactic here?
Solution:
Puzzle 1: 1.Ke7! Kc5. 2.Ke6 +-
Puzzle 2: 1.Kc2 (not Kc3 because of Kb5=) 1. …Ka4 3.Kd3 Kb6 (Kb5 Kc3+-) 4.Kc4+-
Puzzle 3: 1.Ra3! (the idea is to stop the king from making progress)
1. …e3. 2.Ra8! Kf3. 4. Rf8+ = ( White rook will keep checking the black king as the king has no shelter and hence draw)
Puzzle 4: 1.Nb5+ Kb6. 2.Nd6 Kc6. 3.Nc8 Kc7. 4.Na7= (Knight will keep moving on the same squares).
Puzzle 5: 1.Nc1! a2. 2.Nb3#.
Puzzle 6: 1.Rg5! cutting off the White King. 1. …a4 2.Kg7 a3. 3.Rg3! a2. 4.Ra3 +-
Puzzle 7: 1.g4! Ke6. 2.Kd2 Kf7. 3.Ke3 Kg6. 4.Kf4 +-
Puzzle 8: 1.Rf8 White gains time with this check. 1. …Ke3. 2.Rg8 Kf3.
3.Kd3 g3. 4.Rf8+ Kg2. 5.Ke2 +-
Puzzle 9: 1.Kf6 h5. 2.Kg6 h4. 3.h3 Ke7. 4.Kg7 +-
Puzzle 10: 1.Rh8! Rxa7. 2.Rh7+ Kf6. 3.Rxa7 +-
Let us know your score in the comments section.